Proofing dough in a cold mountain kitchen requires more than patience; it requires understanding how altitude, temperature, humidity, and fermentation interact so yeast breads and sourdough can rise reliably and develop full flavor. In mountain homes, kitchens often sit below 68°F, winter indoor air is dry, and reduced atmospheric pressure changes how quickly gases expand inside dough. Proofing is the stage when shaped or bulk-fermenting dough traps carbon dioxide produced by yeast or sourdough microbes, building volume and structure before baking. If proofing is too slow, bread turns dense, pale, and tight-crumbed. If it races ahead, dough weakens, collapses, or over-acidifies. I have baked in cold, drafty alpine kitchens where a dough that doubled in seventy-five minutes at sea level needed nearly three hours on a snowy morning, and where a lively sourdough starter looked sluggish simply because the room sat at 60°F. That gap between recipe timing and mountain reality is why this topic matters. A dependable proofing process lets you make sandwich loaves, dinner rolls, pizza dough, enriched breads, and naturally leavened boules with consistency. It also reduces waste because you stop throwing away “failed” dough that was merely underproofed, chilled, or dehydrated on the surface.
For a hub page on yeast breads and sourdough at altitude, proofing is the central skill because every later decision depends on it: mixing, bulk fermentation, shaping, final rise, scoring, and baking temperature all connect back to fermentation control. Dry mountain air can crust exposed dough and block expansion. Colder rooms slow Saccharomyces cerevisiae in commercial yeast doughs and also slow the wild yeast and lactic acid bacteria in sourdough cultures. Meanwhile, lower air pressure allows dough to inflate more readily, so visual cues matter more than rigid clocks. The practical goal is simple: create a warm, moist, draft-free environment and learn to judge readiness by dough strength, volume, feel, and spring. Once you master that, the rest of high-altitude bread baking becomes far more predictable.
What altitude and cold really do to proofing
High altitude changes bread in two main ways: gases expand more easily, and moisture leaves dough faster. In a mountain kitchen, those effects are layered on top of low ambient temperatures. Cold slows fermentation because yeast and bacteria metabolize sugars more slowly as dough temperature drops. A lean dough mixed to 72°F may ferment steadily; the same formula mixed with cold tap water in a 58°F kitchen can spend the first hour simply warming itself. At the same time, reduced atmospheric pressure means the carbon dioxide that is produced expands more readily, so dough can look larger before it has built enough gluten strength to support that rise. This is why mountain bakers sometimes overproof by appearance alone.
Humidity is the third factor. Winter air in high elevations is often extremely dry, and dough surfaces lose moisture quickly. A skin forms, and that skin resists expansion during proofing. The result can be torn tops, dense seams, and poor oven spring. In sourdough, cold and dryness can also tilt flavor because bacteria keep producing acidity over long timelines even when yeast activity feels slow. The practical implication is that altitude does not mean “always proof less” or “always add more yeast.” It means control dough temperature carefully, protect surface moisture, and assess fermentation by multiple signals. Professional bakers rely on desired dough temperature, container markings, aliquot jars, and finger-dent tests because time alone is unreliable. In mountain kitchens, that discipline is essential rather than optional.
Best proofing temperatures for yeast breads and sourdough
The most useful target for reliable proofing is dough temperature, not room temperature. For many commercial yeast doughs, a final dough temperature around 75°F to 78°F gives predictable bulk fermentation without pushing flavor too hard. Enriched doughs with butter, eggs, or sugar often benefit from a slightly warmer environment, roughly 78°F to 82°F, because fat and sugar can slow fermentation. Sourdough generally performs well when the dough sits near 76°F to 80°F during bulk, though the exact sweet spot depends on starter strength, flour choice, and how sour you want the loaf. Warmer dough ferments faster and tends to produce more lactic acidity; cooler dough moves slower and may emphasize acetic notes, especially during long ferments.
In a cold mountain kitchen, the most effective adjustment is usually warmer mixing water. Use a simple friction-factor approach: if flour and room are cold, water may need to be 90°F to 105°F to land the mixed dough in the desired range. Instant-read thermometers from ThermoWorks or Thermapen-style tools remove guesswork. For sourdough, I often warm the levain, flour, and even the mixing bowl slightly so the dough does not start ten degrees behind target. Avoid creating a hot environment above about 90°F for proofing; that can soften butter in enriched doughs, accelerate enzyme activity, and stress sourdough balance. Gentle warmth is the goal. Consistency beats intensity every time.
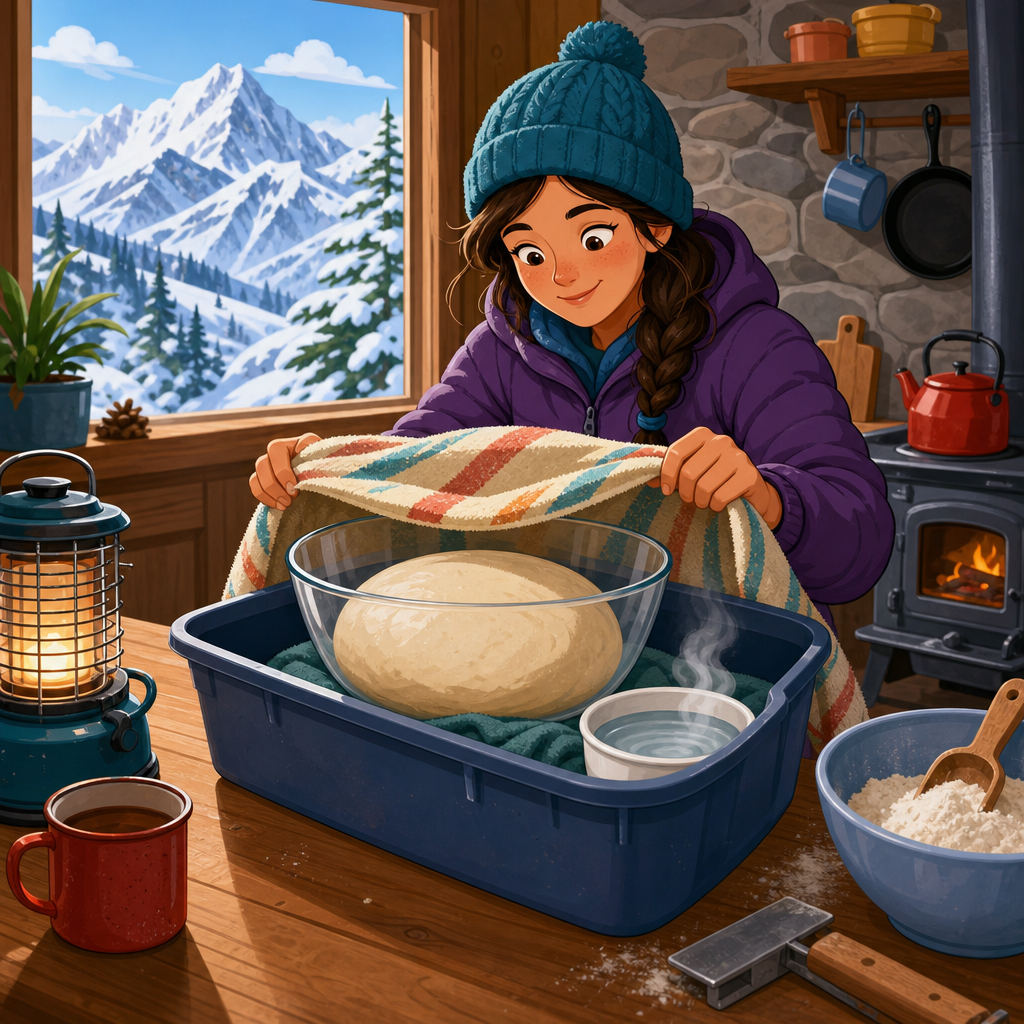
How to create a warm proofing environment without special equipment
You do not need a commercial proof box to proof dough well in the mountains. You need a stable microclimate. The easiest method is the turned-off oven with the light on, provided the bulb raises the cavity only into the mid-70s or low 80s. Verify with an oven thermometer before trusting it. Another dependable setup is a microwave or cooler used as an insulated chamber with a mug of hot water refreshed as needed. The water adds both heat and humidity, which prevents skinning. In my own winter baking, a lidded Cambro container set on a folded towel near, not on, a radiator has saved many doughs, because the towel softens direct heat and the lid traps moisture.
If you bake often, a seed-starting mat or fermentation mat paired with a thermostat is one of the best low-cost upgrades. It creates steady warmth without the spikes of improvised methods. Place the bowl on a rack or folded towel so the bottom of the dough does not overheat. For shaped loaves, cover bannetons or pans with reusable plastic, a shower cap, or a damp cloth plus plastic to retain humidity. Avoid setting dough in direct sun at altitude; bowls can warm unevenly, butter can melt out of enriched doughs, and surface drying can happen fast even when the room feels cold. The right proofing setup is boring, stable, and easy to repeat.
How to tell when dough is proofed correctly
Correct proofing is a combination of volume, feel, structure, and timing relative to dough type. For bulk fermentation in yeast dough, many formulas call for doubling, but at altitude I often look for a 60% to 90% increase instead, especially in softer doughs. Sourdough bulk is usually even more nuanced; depending on dough temperature and flour strength, 30% to 75% growth may be enough before preshaping. A clear straight-sided container helps because you can mark the starting level. An aliquot jar, a small sample of dough kept beside the main batch, gives an even cleaner reading.
The finger-dent test remains useful for final proofing. Press a floured fingertip gently into the dough. If the indentation springs back immediately, it is underproofed. If it returns slowly and partially, it is ready. If it stays sunken and the dough feels fragile or slack, it is likely overproofed. For pan loaves, look for dough rising to the appropriate height relative to the pan rim. For shaped sourdough in bannetons, pay attention to aeration and elasticity: the dough should feel lighter, slightly marshmallowy, and expanded without losing surface tension. Mountain bakers get into trouble when they wait for dramatic size increases in cold conditions, then compensate with too much time. Better results come from combining measured rise with touch and dough temperature.
Practical adjustments for common dough types
Different doughs proof differently in cold mountain kitchens because sugar, fat, hydration, and flour type all affect fermentation speed. Lean white sandwich bread is usually the easiest: warm the dough into the upper 70s, proof covered, and watch volume closely. Whole wheat doughs need extra attention because bran can slow gluten development and cold rooms make them feel especially heavy; an autolyse and slightly warmer dough temperature help. Enriched doughs such as brioche, cinnamon rolls, and milk bread often need the warmest proofing environment of the group because chilled butter and sugar both suppress activity. Pizza dough benefits from flexibility: you can proof warm for same-day use or refrigerate and use a longer fermentation to build flavor while avoiding the cold-room problem altogether.
Sourdough deserves its own approach. In a cold mountain kitchen, many bakers think the starter is weak when the real issue is temperature. Keep the starter where it peaks predictably, often around 75°F to 78°F. Feed ratios matter too; a 1:1:1 feeding moves quickly, while 1:5:5 slows the cycle. Rye flour can boost activity because it provides minerals and enzymes that support fermentation. During bulk, use coil folds or stretch-and-folds to strengthen dough while it ferments. If the room is cold, extend the intervals or move the dough to a warmer chamber rather than adding excessive starter, which can unbalance flavor. For final proofing, cold retardation in the refrigerator remains valuable at altitude because it improves scoring, deepens flavor, and gives you scheduling control, but the dough still needs enough fermentation before it goes cold.
| Dough type | Target dough temperature | Typical mountain proofing strategy | Main risk in a cold kitchen |
|---|---|---|---|
| Lean white yeast dough | 75–78°F | Warm water, covered bowl, oven light or insulated box | Underproofing and dense crumb |
| Whole wheat yeast dough | 76–80°F | Autolyse, warm bulk ferment, extra humidity | Tight crumb and weak rise |
| Enriched dough | 78–82°F | Warm proof box, avoid butter softening too much | Very slow rise |
| Sourdough hearth loaf | 76–80°F | Active starter, measured bulk rise, optional cold retard | Misreading volume and over-acidification |
| Pizza dough | 75–78°F or refrigerated long ferment | Short warm proof or overnight cold fermentation | Dry skin and weak extensibility |
Troubleshooting slow, fast, dry, and overproofed dough
If dough seems stalled, check temperature first. Measure the dough, not just the room. If it is below target, move it to a warmer environment and give it time before changing the formula. Many “dead yeast” diagnoses are really 62°F dough. If commercial yeast genuinely underperforms, confirm that it was stored properly and not mixed directly with very hot water; instant yeast is resilient, but temperatures above roughly 130°F can kill it. For sourdough, test starter readiness by float tests only cautiously; rise after feeding and aroma are more dependable indicators. A mature starter should expand predictably and smell pleasantly yeasty or mildly tangy, not harsh or solvent-like.
If dough is drying out, improve coverage and humidity. Lightly oil the container, use a fitted lid or plastic cover, and add a pan or mug of hot water to the proofing space. If dough proofs too fast despite a cold kitchen, it may have been mixed too warm or over-inoculated. This happens often with recipes copied from sea-level blogs that already run high yeast percentages. Reduce yeast slightly, shorten proofing, or cool the dough sooner. Overproofed dough can sometimes be saved if it is still in bulk: degas gently, reshape, and proof again, understanding that flavor may sharpen and crumb may become finer. Overproofed final loaves are harder to rescue. Pan breads may still bake acceptably, but free-form loaves often spread, score poorly, and lack oven spring. Prevention is better than rescue, which is why records matter. Write down flour brand, hydration, starter ratio, dough temperature, proof time, and kitchen conditions. After two or three bakes, patterns become obvious.
Building a dependable mountain bread workflow
The best mountain bakers do not chase universal timings; they build repeatable systems. Start by standardizing three things: your dough temperature, your proofing setup, and your indicators of readiness. Use the same container for bulk so volume changes are easy to compare. Use the same thermometer and keep notes. If your kitchen is usually cold in the morning, schedule mixing later in the day or use warmer water and a proofing chamber from the start. If you bake sourdough weekly, maintain the starter at a feeding ratio and temperature that fit your routine rather than forcing the dough to adapt to an erratic starter.
This hub for yeast breads and sourdough under Cooking & Baking at Altitude should lead you into more specific techniques: adjusting hydration for dry climates, strengthening gluten in whole grain doughs, managing cold retardation, shaping bâtards and boules, improving oven spring, and calibrating baking temperatures for mountain conditions. The central lesson is that successful proofing in a cold mountain kitchen is not mysterious. It is controlled fermentation. Keep dough warm enough to stay active, humid enough to stay supple, and monitored closely enough that visual cues beat the clock. Do that, and your sandwich loaves will dome properly, your dinner rolls will stay light, your pizza dough will stretch cleanly, and your sourdough will open with balanced crumb and flavor. The next step is simple: pick one dough, track temperature and rise carefully, and repeat the process until your kitchen conditions become an advantage rather than an obstacle.
Frequently Asked Questions
Why does dough rise so slowly in a cold mountain kitchen?
Dough rises slowly in a cold mountain kitchen because fermentation depends heavily on temperature, and yeast and sourdough microorganisms become less active as the dough gets cooler. In many mountain homes, room temperature can stay below 68°F, especially in winter, which significantly slows carbon dioxide production and delays gluten expansion. At the same time, high altitude changes how gas behaves inside dough. Reduced atmospheric pressure allows gases to expand more easily, but that does not necessarily mean fermentation is faster overall. If the dough is cold, the yeast may still produce gas too slowly for reliable proofing, even though the gas that is produced expands more readily. Dry indoor air can also affect the dough’s surface, causing it to lose moisture and form a skin that makes rising more difficult. In practical terms, mountain bakers are dealing with several variables at once: colder dough, drier air, and lower pressure. The result is often proofing that feels unpredictable unless you create a warmer, more controlled environment.
What is the best temperature for proofing dough in a cold mountain kitchen?
For most yeast breads, the ideal proofing range is generally around 75°F to 82°F, while many enriched doughs can proof well slightly warmer and many sourdoughs do best in a moderate, steady range depending on the style of bread you want to make. In a cold mountain kitchen, the goal is not to force rapid proofing with excessive heat, but to maintain a stable, draft-free environment warm enough to support steady fermentation. A turned-off oven with the light on, a microwave with a mug of hot water inside, or a proofing box can work very well. You can also place the dough near, not on, a warm appliance. It is important to avoid temperatures much above 90°F because too much heat can stress or damage yeast, weaken gluten, and reduce flavor development. Consistency matters more than chasing the warmest possible spot. If your kitchen is especially chilly, warming the dough ingredients slightly, using lukewarm water appropriate for your recipe, and monitoring dough temperature after mixing can make a major difference. For mountain baking, a predictable proofing environment helps counteract the combined effects of cold air, dryness, and altitude.
How can I create a good proofing environment without over-drying the dough?
The best proofing environment in a cold, dry mountain kitchen is warm, humid enough to protect the dough’s surface, and sheltered from drafts. Dry indoor winter air can cause the outer layer of dough to crust over, which restricts expansion and can lead to tearing, uneven oven spring, or a rough final texture. To prevent that, cover the dough well while proofing. A lightly greased piece of plastic wrap, a reusable bowl cover, a lid, or a damp but not dripping towel can all help, depending on the container and dough type. If you are using a turned-off oven or microwave as a proofing chamber, add a cup or bowl of hot water to increase humidity gently. For shaped loaves, proofing in a banneton covered with cloth and then enclosed in a bag can help retain moisture. For bulk fermentation, a covered container works especially well. Be careful with direct heat sources like heating pads or radiator tops, which can warm the bottom of the dough too much while leaving the top exposed and dry. A controlled environment with moderate warmth and some humidity will give you better fermentation, smoother dough handling, and more reliable results than simply placing dough in the warmest spot you can find.
Does high altitude change how I should judge when dough is fully proofed?
Yes, high altitude can change how dough behaves, which means bakers should rely less on the clock and more on visual and tactile cues. Because atmospheric pressure is lower at elevation, the gases trapped in dough expand more easily. That can make dough appear puffy sooner, even when fermentation has not fully developed the strength and flavor you want. On the other hand, in a cold kitchen, fermentation may still be moving slowly, so dough can be deceptively inconsistent from one batch to the next. This is why timing alone is often unreliable in mountain baking. Instead, look for signs that match your dough type and stage. During bulk fermentation, the dough should become smoother, slightly aerated, and increased in volume according to the recipe’s expectations. During final proof, many bakers use the gentle poke test: if a lightly floured finger pressed into the dough leaves an indentation that springs back slowly and not completely, the dough is often ready to bake. If it springs back immediately, it likely needs more time; if it collapses or does not recover at all, it may be overproofed. Learning to read the dough is especially important at altitude because lower pressure can exaggerate expansion, while cold temperatures can delay true fermentation maturity.
What are the best ways to speed up proofing safely while still developing good flavor?
The safest way to speed up proofing in a cold mountain kitchen is to improve dough temperature and proofing conditions rather than dramatically increasing the amount of yeast or using excessive heat. Start with slightly warmer water when mixing, keeping the final dough temperature in a range suitable for your recipe. Use a warm, protected proofing spot such as a homemade proof box, a turned-off oven with the light on, or a closed microwave with hot water placed beside the dough. Make sure the dough is covered so the surface stays supple. If your dough is still sluggish, consider extending fermentation rather than forcing it. Good flavor develops when yeast or sourdough has enough time to produce organic acids, alcohols, and aromatic compounds, so a steady rise is often better than a rushed one. You can also adjust your schedule strategically by mixing earlier, using a slightly higher inoculation in sourdough, or adding a modest amount more yeast if your recipe consistently underperforms in your environment. However, large increases can lead to dough that rises fast but tastes flat or becomes difficult to control. In mountain kitchens, the most effective approach is usually balanced: warm the environment, protect moisture, watch the dough closely, and allow enough fermentation time for structure and flavor to fully develop.


